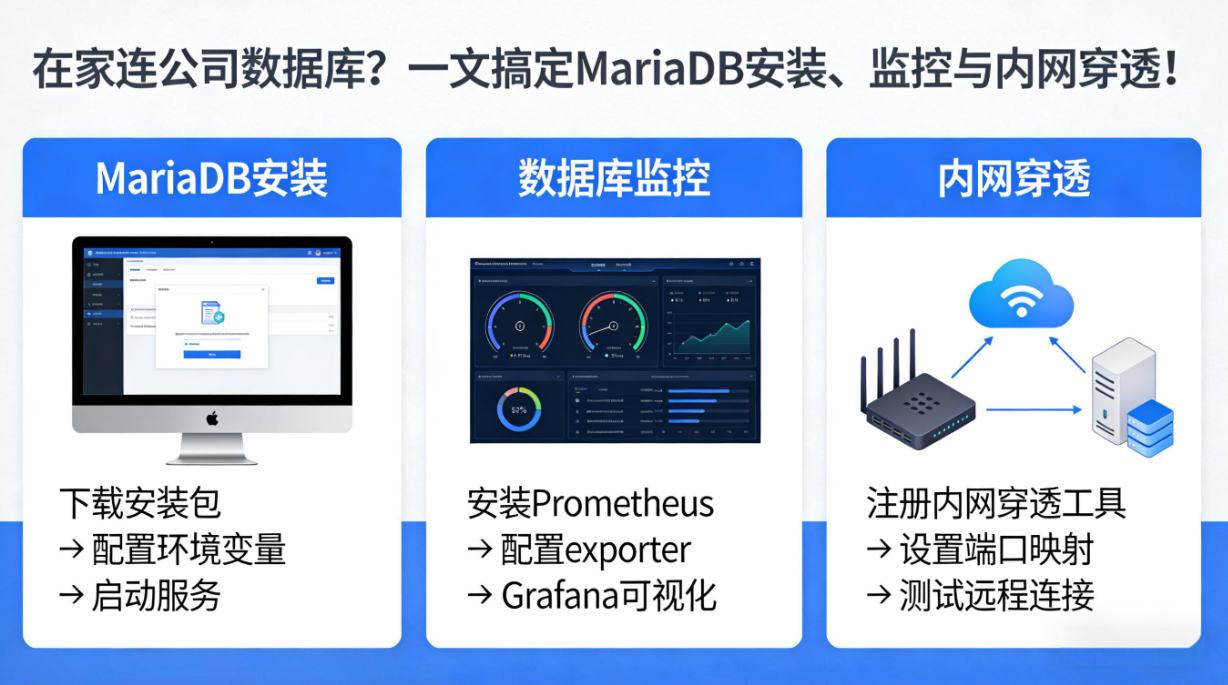
This guide delivers a practical MariaDB operations workflow you can apply immediately: deploy the database on Debian 12, harden it, collect metrics, and enable public remote access. It addresses a common pain point: the database is running, but external users still cannot connect. Keywords: MariaDB, Prometheus, cpolar.
The technical stack is straightforward and production-friendly
| Parameter | Details |
|---|---|
| Operating System | Debian 12 |
| Database | MariaDB 10.6 |
| Monitoring Protocol | Prometheus Metrics / HTTP |
| Remote Access Protocol | TCP |
| Monitoring Components | mysqld_exporter, Prometheus |
| Network Tunneling Tool | cpolar |
| Core Dependencies | curl, systemd, mariadb-server, mysqld_exporter |
| Article Popularity | About 10k views, 34 likes, 32 saves |
This solution closes the gap between database reachability and observability
Many teams deploy databases inside private networks. The service is healthy, and the monitoring dashboard looks fine, but the moment a developer leaves the office network, they can no longer troubleshoot issues, validate configuration, or run ad hoc queries. The problem is not MariaDB itself. The real issue is the gap between database availability and operational reachability.
This architecture closes that gap with three components: MariaDB provides the data service, mysqld_exporter and Prometheus handle metrics collection and alerting, and cpolar creates a controlled remote access path without directly exposing port 3306.
 AI Visual Insight: The image shows the final result page or runtime interface of the full setup. The key takeaway is that the database service, monitoring pipeline, and public remote access path are all connected, highlighting the end state: observable and remotely accessible immediately after setup.
You should confirm the minimum prerequisites before deployment
Prepare at least one Debian 12 host with internet access, a user account with sudo privileges, and a command-line environment that can edit configuration files. It is best to update the system first to reduce dependency conflicts and repository version mismatches.
sudo apt update && sudo apt upgrade -y  # Update package indexes and upgrade installed packages
sudo apt install curl software-properties-common dirmngr -y  # Install repository and download tools
These commands prepare the environment for installation and help ensure that adding the MariaDB repository and downloading dependencies will succeed.
MariaDB should be installed in a standardized way and hardened immediately
MariaDB installs smoothly on Debian-based systems. Use the official repository setup script to pin the target version directly and avoid outdated packages from the default system repository.
curl -LsS -O https://downloads.mariadb.com/MariaDB/mariadb_repo_setup
sudo bash mariadb_repo_setup --mariadb-server-version=10.6  # Use the MariaDB 10.6 repository
sudo apt update
sudo apt install mariadb-server mariadb-client -y  # Install the server and client packages
sudo systemctl enable --now mariadb  # Start MariaDB and enable it at boot
sudo systemctl status mariadb  # Verify service status
These commands add the MariaDB 10.6 repository, install the packages, and start the database service.
You should verify the version and complete the initial security setup immediately after installation
After the first installation, run mysql_secure_installation to perform baseline hardening. This includes setting a root password, removing anonymous users, disabling the test database, and restricting remote root login. This step is necessary in both production and test environments.
SELECT VERSION();
CREATE DATABASE shan;  -- Create a sample database
CREATE USER 'myuser'@'localhost' IDENTIFIED BY 'mypassword';  -- Create a local user
GRANT ALL PRIVILEGES ON shan.* TO 'myuser'@'localhost';  -- Grant access only to the target database
FLUSH PRIVILEGES;  -- Reload privilege tables
This SQL verifies the version, creates a database, and grants permissions according to the principle of least privilege.
MariaDB monitoring should reuse the MySQL ecosystem instead of reinventing it
MariaDB is protocol-compatible with MySQL, so you do not need a dedicated MariaDB exporter. mysqld_exporter already covers the most important metrics for this scenario, including connections, slow queries, lock waits, replication status, and buffer pool metrics.
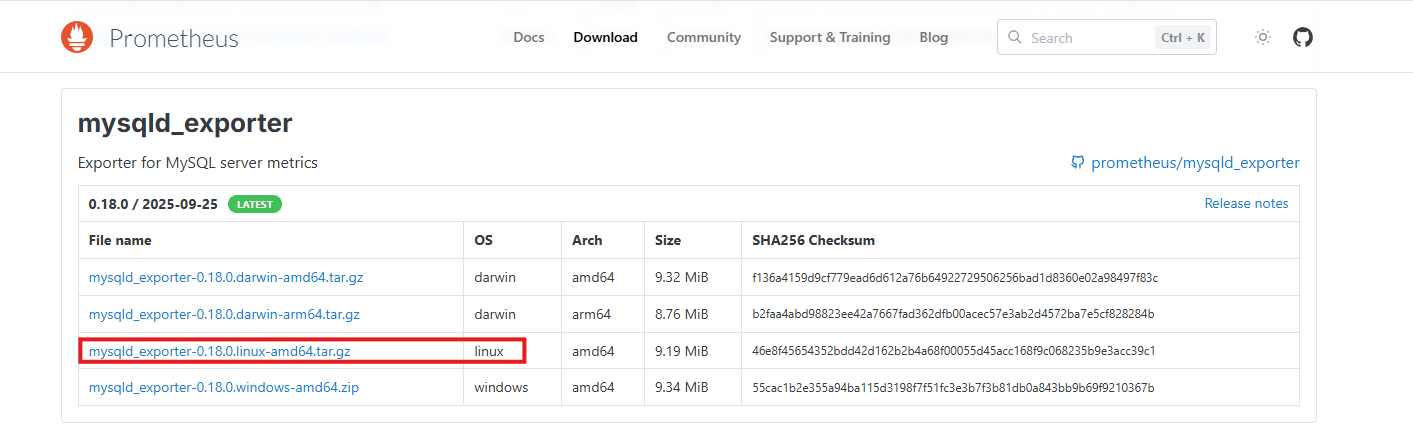 AI Visual Insight: The image shows the mysqld_exporter download page or version selection screen. The key technical point is choosing the correct Linux build for your architecture before managing the exporter with systemd.
wget https://github.com/prometheus/mysqld_exporter/releases/download/v0.18.0/mysqld_exporter-0.18.0.linux-amd64.tar.gz
tar -zxvf mysqld_exporter-0.18.0.linux-amd64.tar.gz  # Extract the exporter archive
mv mysqld_exporter-0.18.0.linux-amd64 /app/mysqld_exporter  # Standardize the deployment directory
These commands download, extract, and place mysqld_exporter into a consistent deployment path.
Monitoring credentials should follow the principle of least privilege
Create a dedicated account for the exporter. Do not reuse an application account, and do not grant write privileges. Typical permissions include PROCESS, REPLICATION CLIENT, and read-only access to performance_schema.
GRANT REPLICATION CLIENT, PROCESS ON *.* TO 'mysqld_exporter'@'localhost' IDENTIFIED BY '12345678';
GRANT SELECT ON performance_schema.* TO 'mysqld_exporter'@'localhost';
FLUSH PRIVILEGES;
This SQL creates a read-only monitoring account with the permissions required for metric collection.
[client]
user=mysqld_exporter
password=12345678
This configuration file stores the database credentials used by the exporter. Restrict the file to permission mode 600.
[Unit]
Description=mysqld_exporter
After=network.target

[Service]
Type=simple
User=prometheus
ExecStart=/app/mysqld_exporter/mysqld_exporter --config.my-cnf=/app/mysqld_exporter/localhost_db.cnf --web.listen-address=:9105
Restart=on-failure

[Install]
WantedBy=multi-user.target
This systemd unit runs the exporter as a managed service and exposes metrics on port 9105.
Prometheus should add mysqld_exporter as a standard scrape target
Once the exporter is running, add a new scrape target in the Prometheus configuration to bring MariaDB into your existing monitoring system. This preserves alerting capabilities and makes later Grafana integration straightforward.
scrape_configs:
  - job_name: "mysqld_exporter"
    static_configs:
      - targets: ["ip:9105"]  # Replace with the exporter host address
        labels:
          app: "mysqld_exporter"
This configuration tells Prometheus to scrape the database metrics exposed by mysqld_exporter on a schedule.
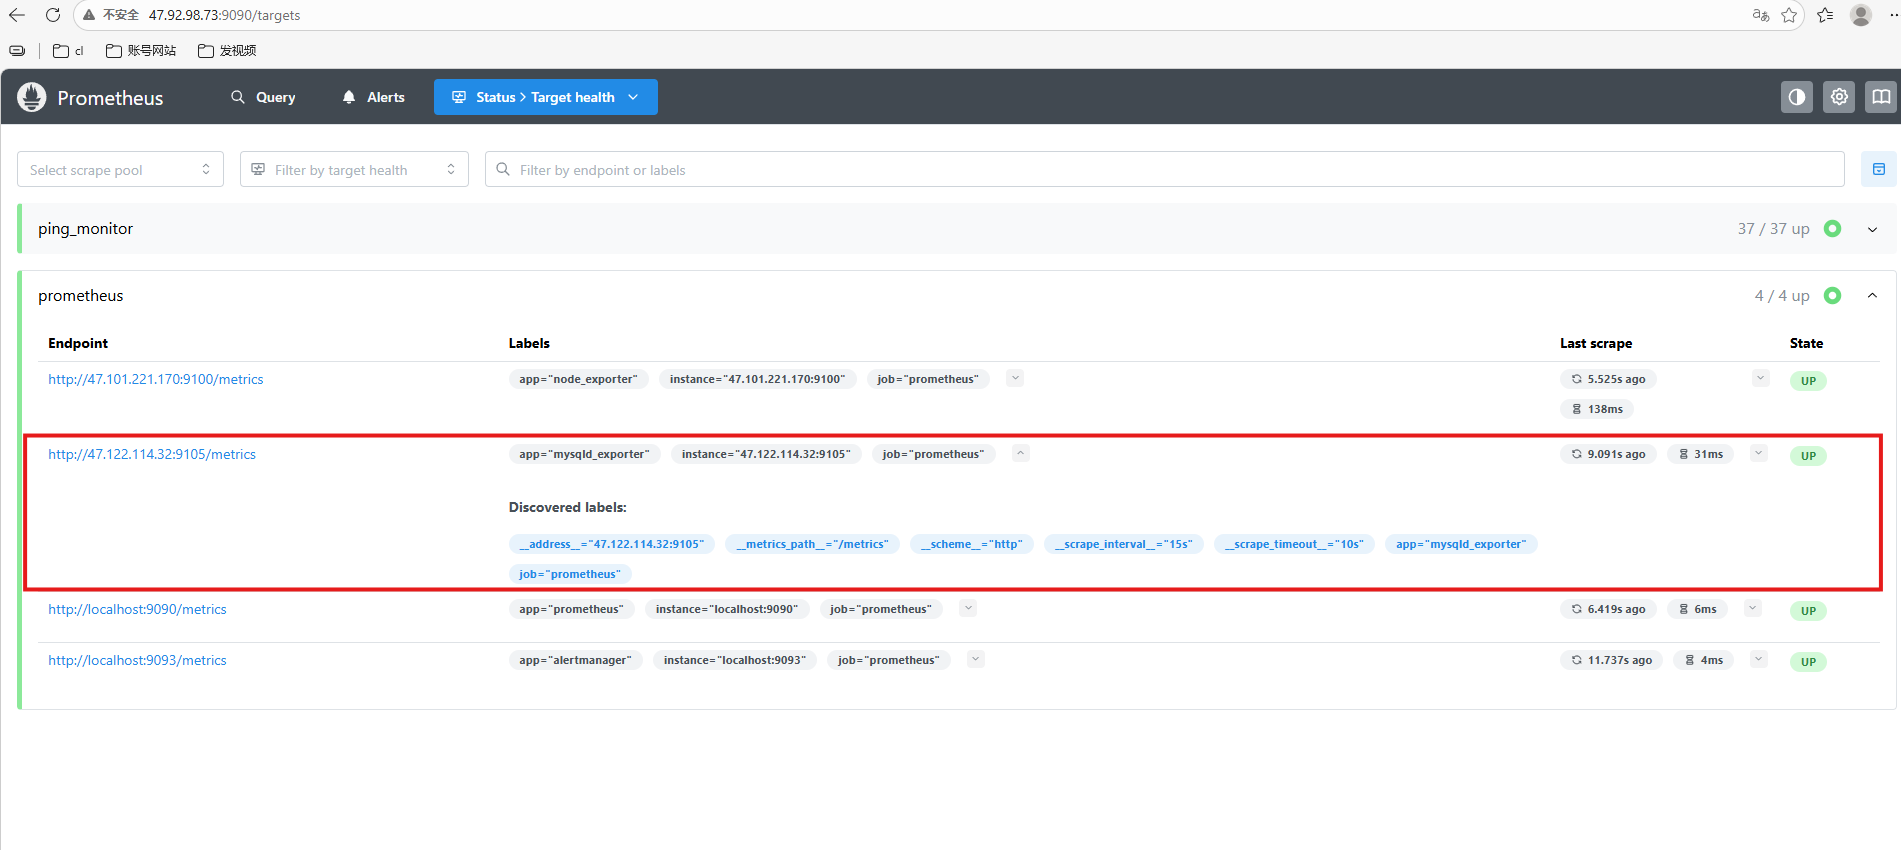 AI Visual Insight: The image shows the Prometheus target status page where mysqld_exporter is already discovered. This confirms that the scraping path is working and the database metrics have entered the centralized monitoring system.
Remote access should use a tunnel instead of exposing the database port directly
A common mistake in remote database access is opening port 3306 directly on the firewall. A safer approach is to create a TCP tunnel with cpolar, exposing the internal MariaDB service through a controlled public endpoint without changing the existing network architecture.
sudo curl https://get.cpolar.sh | sh  # Install cpolar with one command
sudo systemctl status cpolar  # Verify that the service is running
These commands install cpolar and confirm that the service is active. You can then configure the tunnel through the web UI.
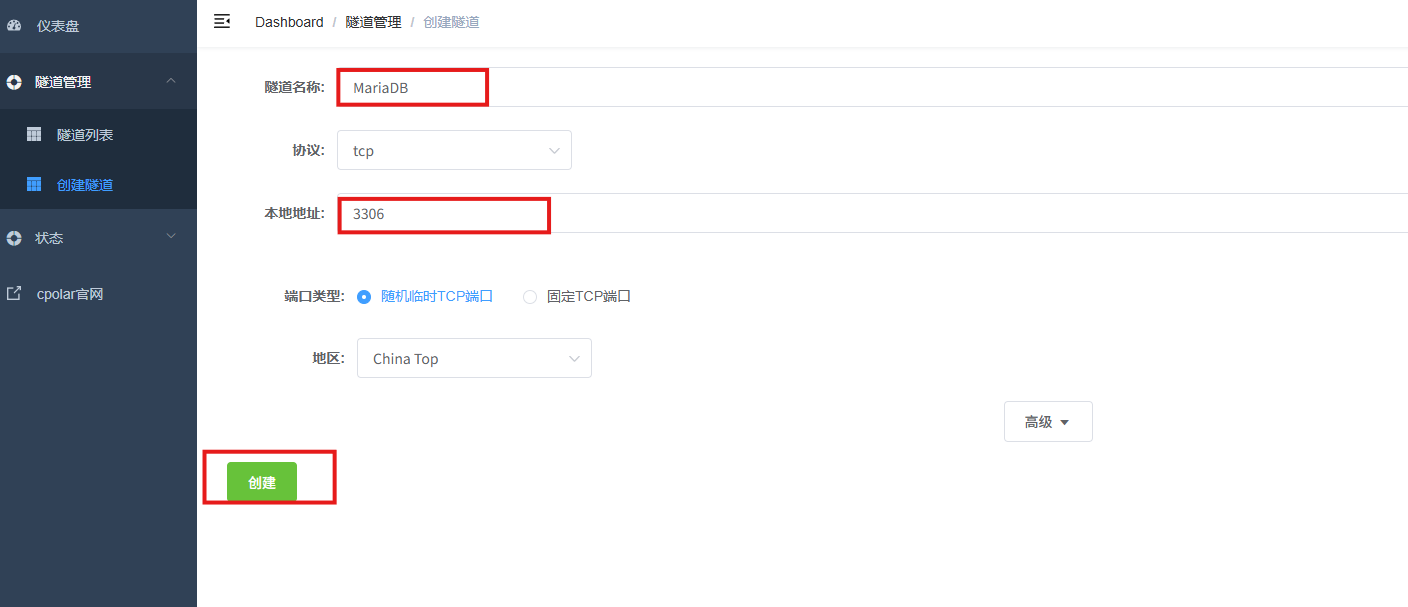 AI Visual Insight: The image shows the key parameters used to create a TCP tunnel in cpolar, including the tunnel name, protocol type set to TCP, local port 3306, and access region. It makes clear that database access will be published through port forwarding.
You should validate client connectivity immediately after the public endpoint is created
After you create the tunnel, the platform assigns a public domain name and port. You can use a standard MySQL client to connect back to the internal database from a remote terminal.
mysql -h 2.tcp.cpolar.top -P 15969 -u remote_user -p # Connect to MariaDB through the public tunnelThis command verifies that the database is now reachable across networks.
If your workflow requires a stable endpoint, reserve a fixed TCP address in cpolar and rebind the tunnel to that address. This avoids random port changes after restarts that could break scripts, connectors, or runbooks.
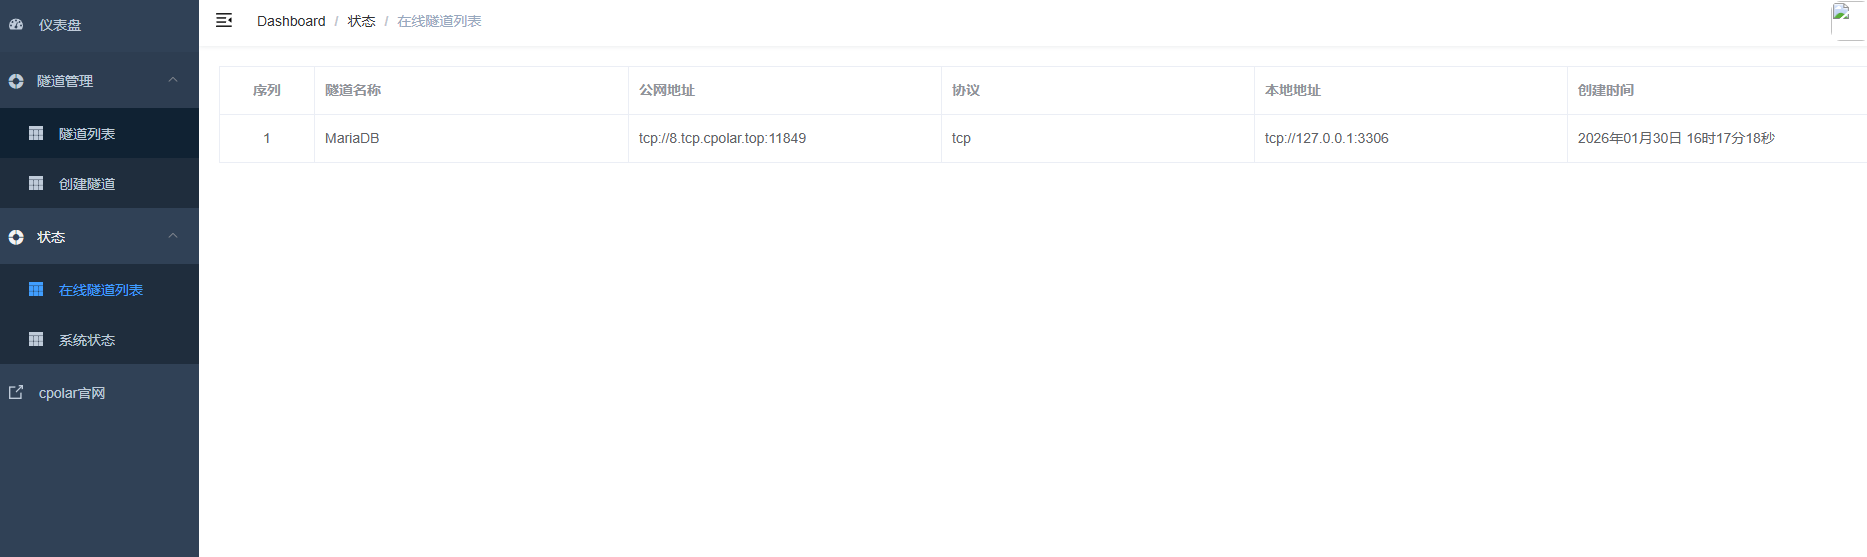 AI Visual Insight: The image shows the online tunnel list after a fixed TCP address has taken effect. The key point is that the original random public address has been replaced with the reserved one, giving the remote database endpoint the stability required for long-term operations.
This architecture works especially well for lightweight teams and emergency remote operations
Its advantage is not hyperscale performance. Its value is low cost, fast deployment, and clear separation of responsibilities. The database, monitoring stack, and tunnel are independent and replaceable, but together they create a complete operational loop: visible runtime status, actionable troubleshooting, and remote connectivity from outside the local network.
That said, understand the boundaries. cpolar solves network reachability, not database authorization governance. mysqld_exporter improves observability, not automatic remediation. A secure implementation still requires separate accounts, least-privilege access, strong passwords, fixed addresses, and auditing.
FAQ
1. Why can MariaDB use mysqld_exporter directly?
Because MariaDB is highly compatible with MySQL at the protocol layer. mysqld_exporter collects status information and system table data exposed through the MySQL protocol, so you do not need a MariaDB-specific exporter.
2. Why is it not recommended to expose port 3306 directly to the public internet?
Directly exposing the database port significantly expands the attack surface and increases the risk of brute-force attempts, vulnerability scanning, and unauthorized access. A controlled tunnel through cpolar is better suited for temporary operations and remote access into private network environments.
3. What are the most important security actions before putting this solution into production?
At a minimum, complete these four tasks: run mysql_secure_installation, create separate accounts for monitoring and remote access, grant only least-privilege permissions, and use a fixed public endpoint together with strong passwords or additional access controls.
[AI Readability Summary]
This guide builds a practical MariaDB workflow for operations teams and backend developers. You install and harden MariaDB on Debian 12, connect it to Prometheus through mysqld_exporter, and then use cpolar to create a TCP tunnel for secure remote access. The result is a database platform that is observable, operable, and reachable from outside the local network.