Technical Specifications at a Glance
| Parameter | Description |
|---|---|
| Platform | Windows + PowerShell |
| Integration Protocol | OpenAI-compatible API |
| Default Console | http://127.0.0.1:18789 |
| Configuration File | ~\.openclaw\openclaw.json |
| Core Dependencies | PowerShell, browser, valid API Key |
| Key Fields | baseUrl, apiKey, primary, gateway.auth.token |
| GitHub Stars | Not provided in the source content |
This article shows the shortest path to a working setup
OpenClaw’s core value is that it quickly connects a local AI assistant gateway to a large language model API. In practice, most first-time users get stuck not on installation itself, but on Base URL, API Key, model name, and Gateway Token. This guide provides a Windows-tested workflow and a practical troubleshooting sequence. Keywords: OpenClaw, Windows, API configuration.
The most common failure during a first OpenClaw installation is not the install command itself. It is finishing the install and then not knowing how to actually connect a model. The shortest path is: install OpenClaw, use QuickStart, enter the API Key, confirm the model name, open the local console, and enter the Gateway Token.
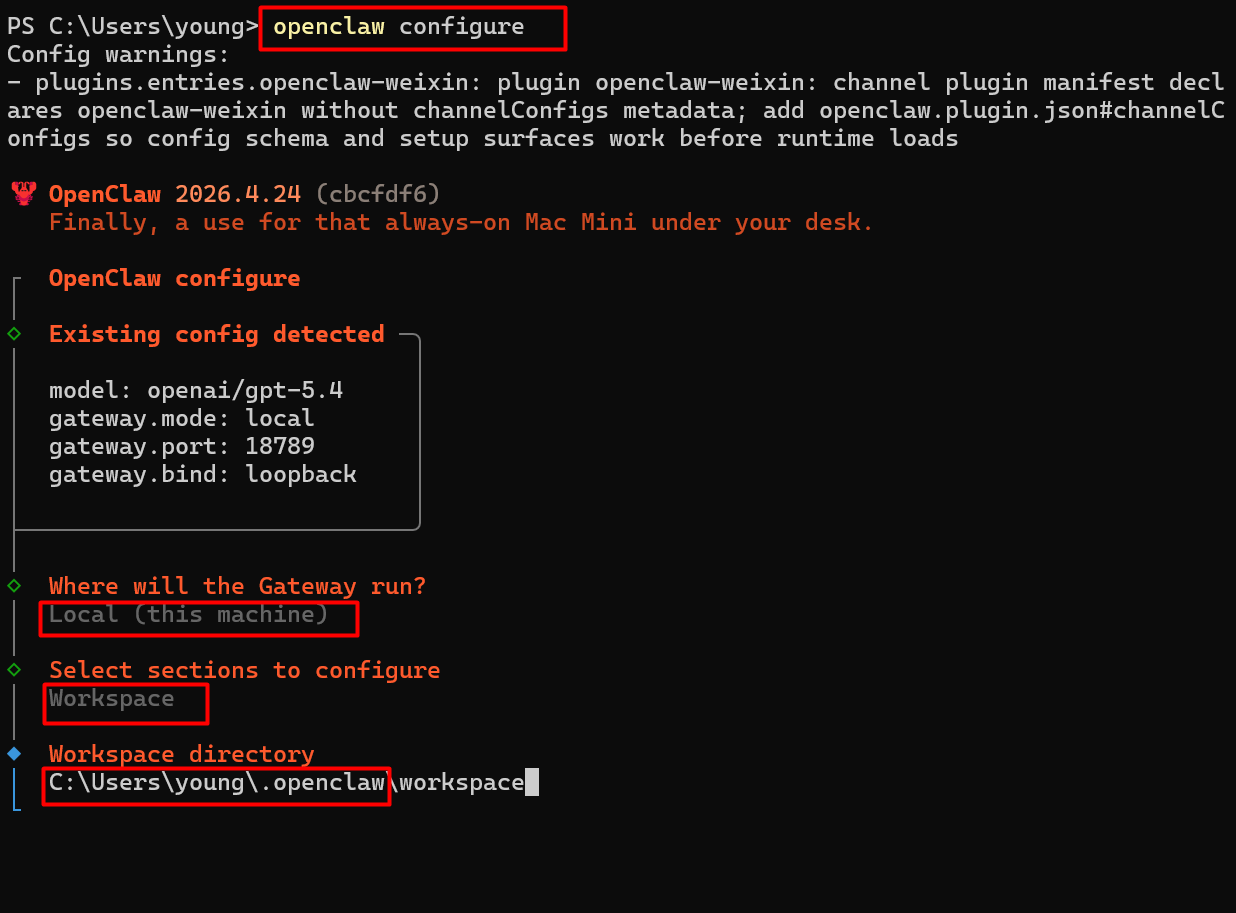
 AI Visual Insight: This image shows the first-run wizard interface and the key decision path. It highlights QuickStart, model provider selection, and the local console entry point, making it a useful overview of the initialization workflow.
You can follow the shortest working path directly
# Run the official installation script in PowerShell
iwr -useb https://openclaw.ai/install.ps1 | iex
This command downloads and executes the OpenClaw installation script, completing the local installation and initializing the setup entry point.
After installation, use this order of selections: QuickStart, Use existing values, choose OpenAI as the model provider, enter your API Key, set the model to openai/gpt-5.4, choose Skip for now for web search, and keep the network mode as Loopback (Local only).
You must prepare four types of information before installation
Before you begin, prepare at least a Windows machine, PowerShell with internet access, a browser, and a valid large language model API Key. If you are connecting to a third-party service that is compatible with the OpenAI API, you must also confirm the Base URL and model name in advance.
In many cases where “the key is correct but the request still fails,” the root cause is not permissions. It is a mismatch between baseUrl and the primary model. OpenClaw is only the gateway. The backend model configuration is what actually determines whether inference requests can succeed.
The first-run wizard should use conservative settings first
For a first installation, QuickStart is usually better than Manual. The goal of QuickStart is clear: get a working instance as quickly as possible. Manual mode is better suited to users who already understand each configuration section.
For Config handling, choose Use existing values first. If there is no previous local configuration, this effectively keeps the current defaults and lets you continue entering values. If you want to fully reset the configuration, choose Reset instead.
QuickStart
Use existing values
OpenAI
openai/gpt-5.4
Skip for now
Loopback (Local only)
This set of choices fits most first-time deployment scenarios. The goal is to establish a stable, verifiable minimum configuration first.
Access to the web console depends on the local gateway and token
After installation, open http://127.0.0.1:18789 in your browser. If the page shows a login prompt, it is asking for the Gateway Token, not the model API Key. These two credentials serve completely different purposes and are not interchangeable.
The Gateway Token is stored in the local configuration file at the default path ~\.openclaw\openclaw.json. Open that file and look for gateway.auth.token.
 AI Visual Insight: This image shows the configuration entry point or file location workflow. Its main value is helping users confirm where the configuration file lives and understand that the web console login credential comes from the local configuration file.
Use this minimum checklist for the token and port
{
  "gateway": {
    "auth": {
      "mode": "token",
      "token": "your-gateway-token"
    },
    "port": 18789,
    "bind": "loopback"
  }
}
This configuration defines the console login token, listening port, and local access mode. It is the core fragment that determines whether the web console works correctly.
The real source of model connectivity is openclaw.json
If the console opens but the model does not respond, check openclaw.json first. This file controls gateway behavior, model provider settings, authentication, and default model routing.
The most important fields are models.providers.openai.baseUrl, models.providers.openai.apiKey, and agents.defaults.model.primary. An error in any of these can cause requests to fail or return empty results.
 AI Visual Insight: This image shows the hierarchical structure of
 openclaw.json, emphasizing the relationship between configuration sections such as gateway, auth, models, and agents. It helps developers build a layered understanding of web console settings versus model integration settings.
Here is a reference minimum model configuration
{
  "agents": {
    "defaults": {
      "model": {
        "primary": "openai/gpt-5.4"  // Default primary model
      }
    }
  },
  "models": {
    "providers": {
      "openai": {
        "baseUrl": "https://example.com/v1",  // OpenAI-compatible endpoint
        "apiKey": "sk-xxxx",                  // Model service API key
        "api": "openai-completions"
      }
    }
  }
}
This configuration declares the default model, provider endpoint, and authentication details. It is the key routing configuration that OpenClaw uses to send inference requests.
You must restart the gateway after editing the configuration
Many users correct the JSON file but still see the service use the old settings. The usual reason is not a bad edit. It is that the gateway was never restarted. Every time you modify openclaw.json, restart the gateway immediately.
# Restart the gateway after editing the configuration file so the new settings take effect
openclaw gateway restart
This command refreshes the gateway process so it reloads the port, token, and model configuration.
Troubleshooting should follow a fixed sequence instead of trial and error
For troubleshooting, follow this four-step order: first confirm that you edited the correct file path; then verify Base URL, API Key, and model name; next check the browser address and Gateway Token; finally restart the gateway.
 AI Visual Insight: This image shows a troubleshooting sequence that moves from configuration path, to model parameters, to token validation, and finally to service restart. It emphasizes issue isolation order and helps reduce wasted debugging effort.
These are the commands worth memorizing
# Re-enter the configuration wizard
openclaw configure

# Restart or stop the gateway
openclaw gateway restart
openclaw gateway stop

# Manage the background service
openclaw service start
openclaw service stop
openclaw service enable
openclaw service disable

# Configure web search separately
openclaw configure --section web
This command set covers wizard re-entry, gateway management, service lifecycle control, and extended feature configuration. It is the minimum command set for day-to-day operations.
The best first-deployment strategy is to get it working before expanding it
When using OpenClaw for the first time, you do not need to start with multi-model orchestration, remote access, or plugin ecosystems. A more reliable approach is to first confirm local console access and successful model responses, then expand gradually to WeChat integration, web search enhancement, or multi-session terminals.
If you exit the configuration wizard midway, you do not need to reinstall. Just run openclaw configure to resume the process. For most developers, getting the end-to-end path working matters more than understanding every configuration detail on day one.
FAQ
Q1: Why can I open the web console, but the model returns no result?
A: First check baseUrl, apiKey, and agents.defaults.model.primary. If the console opens, it only means the local gateway is running. It does not mean the model provider is configured correctly.
Q2: What is the difference between Gateway Token and API Key?
A: The Gateway Token is used to log in to the local web console. The API Key is used to call the remote large language model API. The former is stored at gateway.auth.token, and the latter at models.providers.openai.apiKey.
Q3: Why does editing openclaw.json still have no effect?
A: In most cases, the gateway was not restarted. After saving the configuration, run openclaw gateway restart to ensure the process reloads the new settings.
Core summary
This guide reconstructs the shortest working path for connecting OpenClaw to a large language model API on Windows. It covers installation, the configuration wizard, key openclaw.json fields, Gateway Token retrieval, gateway restart, and common troubleshooting steps, helping developers quickly establish a working path between the local console and model inference.