This is a video recording demo solution built with Flutter for OpenHarmony. It focuses on video recording UI, recording controls, an editing entry point, and page integration, addressing the lack of a unified interaction framework for multimedia demos on the OpenHarmony side. Keywords: Flutter, OpenHarmony, video recording.
This solution targets video capability demo scenarios for Flutter and OpenHarmony.
| Parameter | Description |
|---|---|
| Language | Dart / Flutter |
| Target Platform | OpenHarmony / HarmonyOS-compatible devices |
| License | Originally marked as CC 4.0 BY-SA |
| Stars | Not provided in the source content |
| Core Dependencies | Flutter Material, dart:async Timer |
This implementation validates the full video recording interaction flow through a pure UI approach.
The original solution has a very clear goal: instead of integrating a native camera directly, it first builds a stable, presentable, and reusable interaction framework for recording and editing. The value of this approach is that teams can validate page structure, state transitions, and OpenHarmony device adaptation first, then gradually replace the mock layer with real media capabilities.
It covers three core capability areas: the recording area handles preview, start, stop, and timing; the control area handles flash, camera switching, and settings; and the editing area handles trimming, subtitles, music, filters, speed control, and export. This split works especially well for component-based development.
Core capabilities can be abstracted through a unified data model first.
class VideoInfo {
  final String id;
  final String title;
  final Duration duration;
  final DateTime createTime;
  final String fileSize;
  final String? thumbnail;
  final String? filePath;

  VideoInfo({
    required this.id,
    required this.title,
    required this.duration,
    required this.createTime,
    required this.fileSize,
    this.thumbnail,
    this.filePath,
  });
}

String formatVideoDuration(Duration duration) {
  String twoDigits(int n) => n.toString().padLeft(2, '0');
  final minutes = twoDigits(duration.inMinutes.remainder(60));
  final seconds = twoDigits(duration.inSeconds.remainder(60));
  final hours = twoDigits(duration.inHours);
  return [if (duration.inHours > 0) hours, minutes, seconds].join(':'); // Standardize duration text output
}
This code standardizes how video metadata is described and provides a duration formatting utility that can be rendered directly in the UI.
The key value of the recording component lies in a state machine that is simple and extensible.
The recording module forms a minimal closed loop with _isRecording, _recordingDuration, and Timer. When recording starts, it resets the duration and starts the timer. When recording stops, it disposes of the timer and shows a result prompt. This makes the demo logic very easy to follow.
Although the preview area is only a black container, the REC badge, the recording duration in the upper-right corner, and the state changes on the primary button already simulate the main feedback layers of a real camera interface. This makes it suitable for design collaboration and interaction reviews.
Recording state control should prioritize accurate timing and proper resource cleanup.
void _startRecording() {
  setState(() {
    _isRecording = true;
    _recordingDuration = Duration.zero; // Reset duration before each recording session
  });
  _timer = Timer.periodic(const Duration(seconds: 1), (_) {
    setState(() {
      _recordingDuration = Duration(seconds: _recordingDuration.inSeconds + 1); // Increment recording duration every second
    });
  });
}

void _stopRecording() {
  setState(() {
    _isRecording = false; // Update recording state after stopping
  });
  _timer?.cancel(); // Release the timer to avoid memory leaks
}
This code implements the most critical parts of the recording lifecycle: start, timing, and stop control.
The recording settings area completes the user’s baseline expectations for capture controls.
Many demo pages include only a record button, but real users expect at least flash control and front/rear camera switching. The original solution encapsulates this part as an independent component, which reduces the complexity of the main page and reserves a clean replacement point for future MethodChannel integration.
The most valuable design choice here is the consistent structure of control items: icon, label, and tap feedback all follow the same pattern. That means you can later add resolution, frame rate, stabilization, and other settings without redesigning the existing layout.
Componentizing control buttons makes migration to a real camera implementation easier.
Widget _buildControlButton({
  required IconData icon,
  required String label,
  required VoidCallback onTap,
}) {
  return InkWell(
    onTap: onTap,
    child: Column(
      children: [
        Icon(icon, size: 28, color: Colors.white),
        const SizedBox(height: 4),
        Text(label), // Render the control item title consistently
      ],
    ),
  );
}
This code abstracts a reusable interaction unit for the recording control area, making future batch expansion easier.
The video editing area serves as the entry point for post-recording processing.
This part does not implement real editing algorithms. Instead, it first establishes content management and tool entry points: the upper section displays a video grid, and the lower section displays an editing tool matrix. For a demo project, this information architecture matters more than integrating complex capabilities too early.
The video card preserves title, duration, and a thumbnail placeholder, which is already enough to support the main path of “select media → enter editing.” In the future, if you integrate FFmpeg, a native editing SDK, or OpenHarmony media capabilities, the same data model can still be reused.
 AI Visual Insight: This screenshot shows the primary interaction area of the video recording page. The top section is a simulated camera preview area, the middle area displays recording status and timing information, and the bottom area includes action buttons such as capture, record, and stop. The page uses a dark immersive layout to reinforce the feel of a shooting scenario.
 AI Visual Insight: This screenshot highlights the layout of the recording control area and settings area. Multiple icon buttons are evenly distributed, indicating that the UI uses a modular control panel design that works well for high-frequency auxiliary actions such as flash, camera switching, and settings.
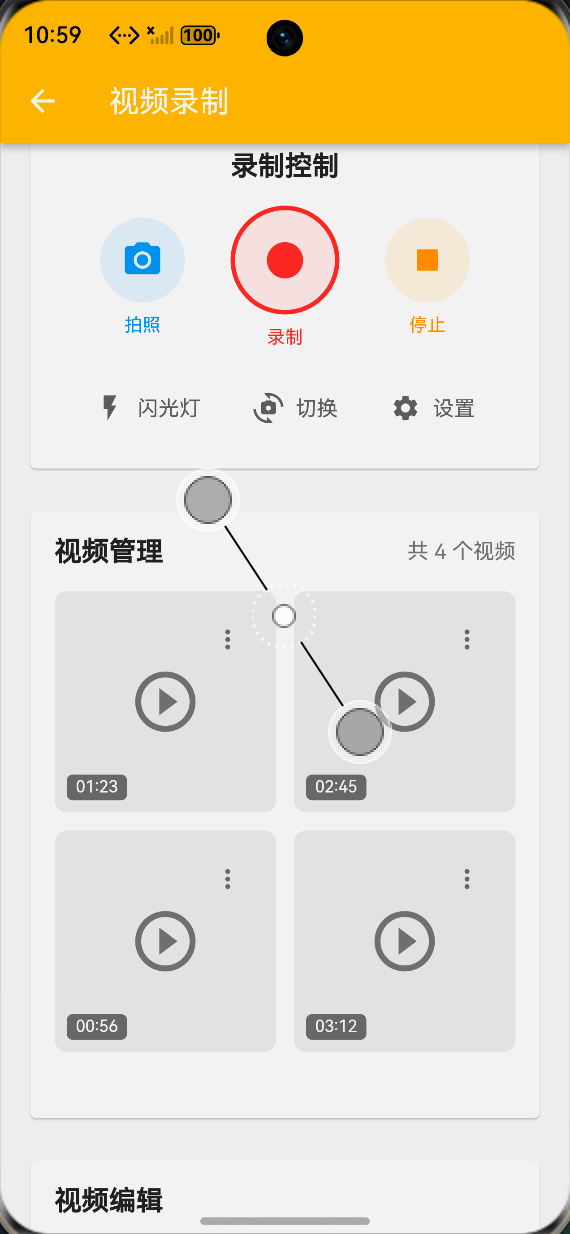 AI Visual Insight: This screenshot presents the video management and editing tools view. Grid cards hold video thumbnails and metadata, while the tool area at the bottom or middle provides entry points for trimming, subtitles, music, filters, and more. This reflects a two-layer editing structure built around “media management + post-processing tools.”
A Tab-based layout should be used to separate recording and editing responsibilities.
body: TabBarView(
  controller: _tabController,
  children: [
    _buildRecordingTab(), // Group recording-related pages into an independent tab
    VideoEditingWidget(videoList: _videoList), // Reuse an independent component for the editing area
  ],
)
This code decouples the recording flow from the editing flow through a two-tab layout, making the page easier to maintain and extend.
Real OpenHarmony deployment must prioritize permissions and native capability adaptation.
A pure UI demo can run consistently across devices, but once you enter a real video recording scenario, you must handle camera, microphone, and storage permissions, along with the availability of OpenHarmony native APIs or compatible plugins. In particular, multimedia libraries that support only Android or iOS usually cannot be reused directly on OpenHarmony.
Another common challenge is performance. Long recording sessions, large file exports, and filter previews all add memory and rendering pressure. Prioritize asynchronous task splitting, export progress indicators, and resource cleanup to prevent lag or crashes on mid-range and low-end devices.
FAQ
1. Why doesn’t this solution connect to a real camera directly?
Because its goal is to validate the UI, interaction flow, and OpenHarmony adaptation first. Building the demo framework first allows teams to complete page integration and collaboration at a lower cost before connecting native camera capabilities.
2. What capabilities must be added to support real video recording on OpenHarmony?
At a minimum, you need camera, microphone, and storage permissions, plus OpenHarmony-compatible camera and media APIs. You also need to handle the full workflow for recording, saving, playback, and export.
3. What project stage is this codebase best suited for?
It is best suited for prototype validation, technical exploration, article demos, and cross-platform capability showcases. If the project moves into production, you should continue by adding native media integration, exception handling, and performance optimization.
Core Summary: This article reconstructs a Flutter-based video recording demo solution for OpenHarmony, covering the video data model, recording state control, recording settings, video editing tools, and page integration. It also summarizes key points for OpenHarmony adaptation, permissions, and performance, making it a practical foundation for quickly building a presentable and extensible video processing entry point.