This article focuses on the standardized creation of academic three-line tables, addressing common issues such as inconsistent table formatting in Word, WPS, and LaTeX, missing header rules, and messy continued tables across pages. The core topics include line specifications, three implementation paths, and practical pitfalls to avoid. Keywords: three-line table, Word, LaTeX.
Technical Specifications Snapshot
| Parameter | Description |
|---|---|
| Document Topic | Academic three-line table creation |
| Applicable Tools | Word, WPS, LaTeX |
| Standard Reference | CY/T 170—2019 Academic Publishing Standard: Tables |
| Core Rules | Top rule 1.5 pt, header rule 0.75 pt, bottom rule 1.5 pt |
| Core Dependencies | Word table styles, WPS border settings, LaTeX booktabs |
| Collaboration Scenarios | Thesis writing, SCI journals, course reports |
The core purpose of a three-line table is to reduce visual noise and strengthen data structure
A three-line table is a rule-minimized table format. It does not rely on dense grid lines to separate information. Instead, it establishes reading hierarchy through a top rule, a header rule, and a bottom rule. Compared with full-grid tables, it is cleaner and better aligned with academic publishing requirements.
A complete academic table usually includes the table number, table title, table header, table body, and table notes. A three-line table only constrains the border style; it does not literally mean there can be only three lines. When the header uses a multi-level structure, you may add auxiliary thin rules.
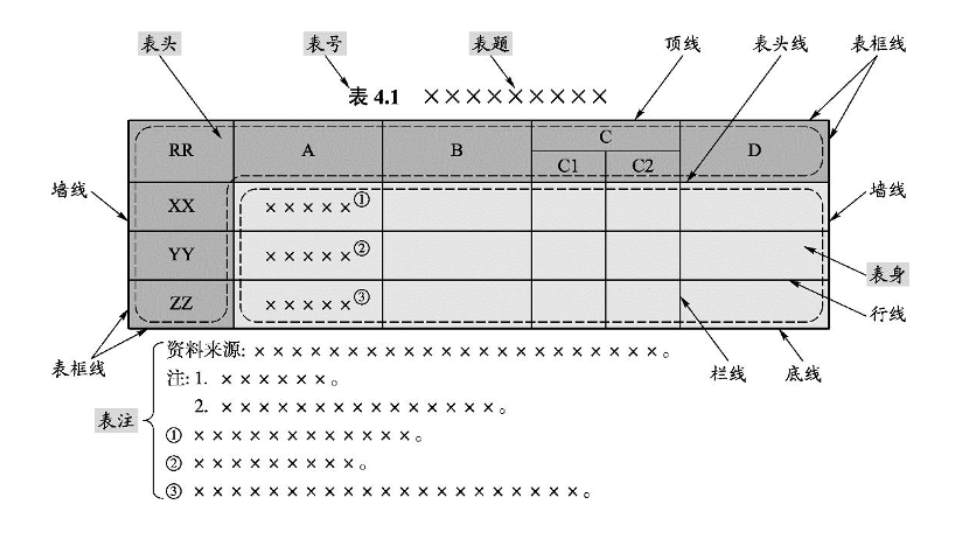 AI Visual Insight: The image shows the structural sections of a standard academic table, usually including the table number, table title, table header, data area, and table notes. It emphasizes that a three-line table is not defined only by borders; it also requires compliant information hierarchy, title semantics, and note placement.
Core standards must come before software operations
The most common mistake is to look for buttons first and discuss standards later. The correct order is to define line weights, header hierarchy, and note requirements first, then decide whether to implement them in Word, WPS, or LaTeX.
| Rule Name | Position | Standard Value |
|---|---|---|
| Top Rule | At the top of the table | 1.5 pt |
| Header Rule | Between the header and the data area | 0.75 pt |
| Bottom Rule | At the bottom of the table | 1.5 pt |
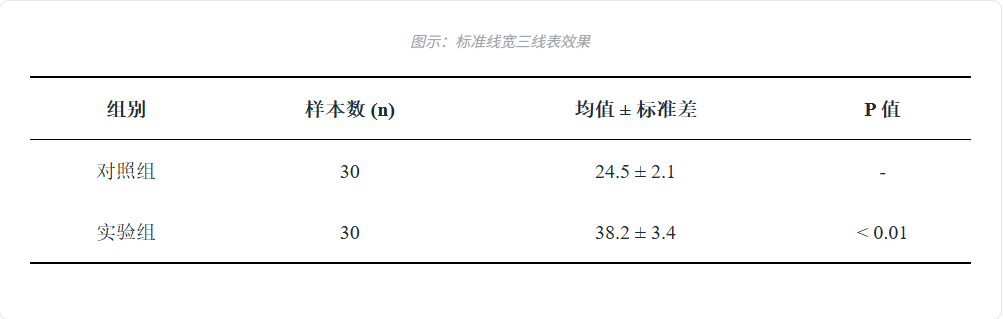 AI Visual Insight: The image clearly presents the “two thick, one thin” relationship: the top and bottom horizontal rules are visibly thicker than the middle header rule. There are no vertical lines inside the table, so the visual focus stays on column labels and data alignment.
WPS works well for fast drafts but still requires manual verification of point sizes
The built-in three-line table style in WPS is useful for fast drafting, especially for course papers or short reports that only need basic formatting. Its advantage is the low learning curve, but the default style may not strictly match the requirements of your university or journal.
The workflow is simple: insert a table, select the entire table, apply the built-in style, and then open the border settings to verify the rule weights. Some education editions may not include the built-in style, in which case you need to switch to the manual method.
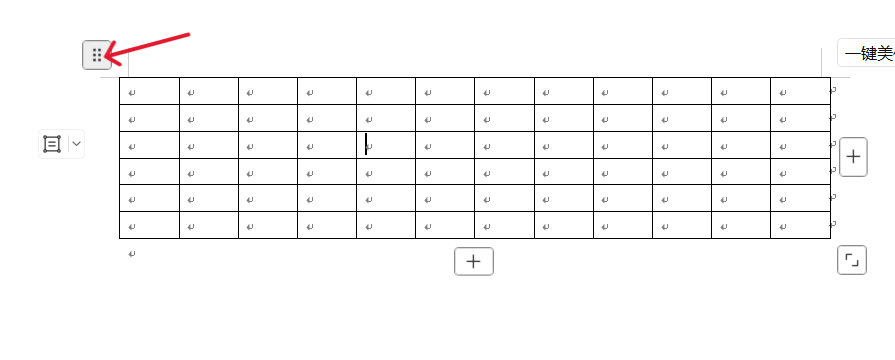 AI Visual Insight: The image shows the style panel in the WPS table tools area. After selecting a table, users can directly apply a preset style, which indicates that WPS provides a template-based entry point for three-line tables, although the details still need further adjustment.
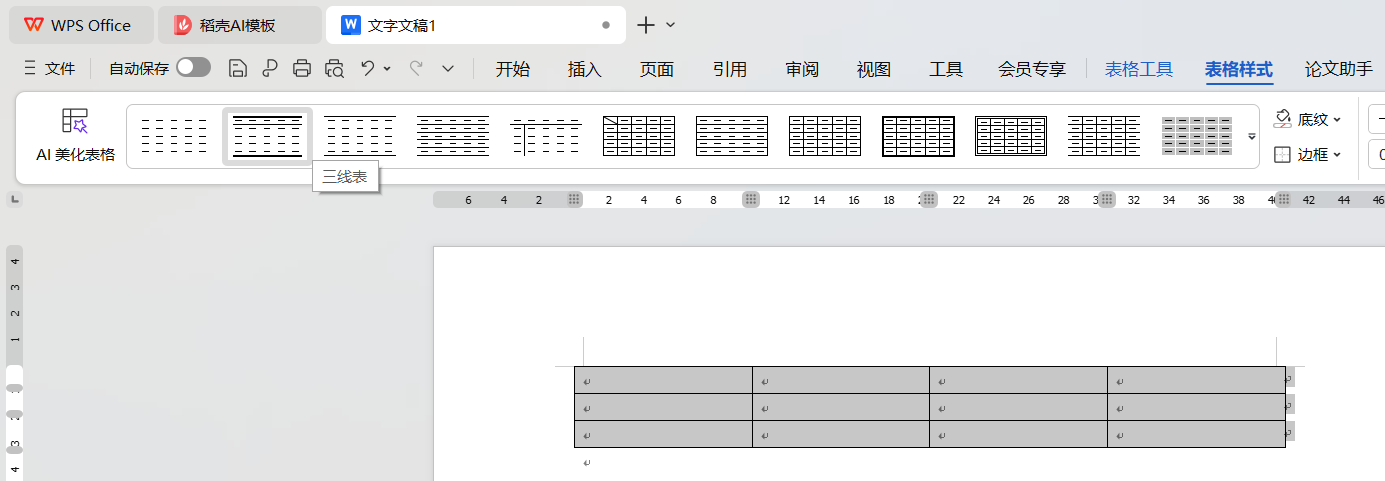 AI Visual Insight: The image shows the result after applying a preset style. The outer frame is simplified into two main horizontal rules, with one separator line below the header, matching the basic visual form of a three-line table.
1. Select the entire table
2. Clear all existing borders
3. Set the top and bottom borders to 1.5 pt
4. Select the header row only
5. Set the bottom border of the header row to 0.75 pt
This set of steps works for one-off rapid table creation in both WPS and Word.
Word custom styles are better for batch thesis formatting
When a paper contains many tables, custom table styles in Word are the most efficient option. The key is not simply “creating a style,” but binding different border rules to two distinct scopes: the entire table and the header row.
Many tutorials fail because they miss the “Header Row” toggle. Even if the style itself defines a bottom border for the header, the header rule will not appear unless you enable “Header Row” in Table Style Options.
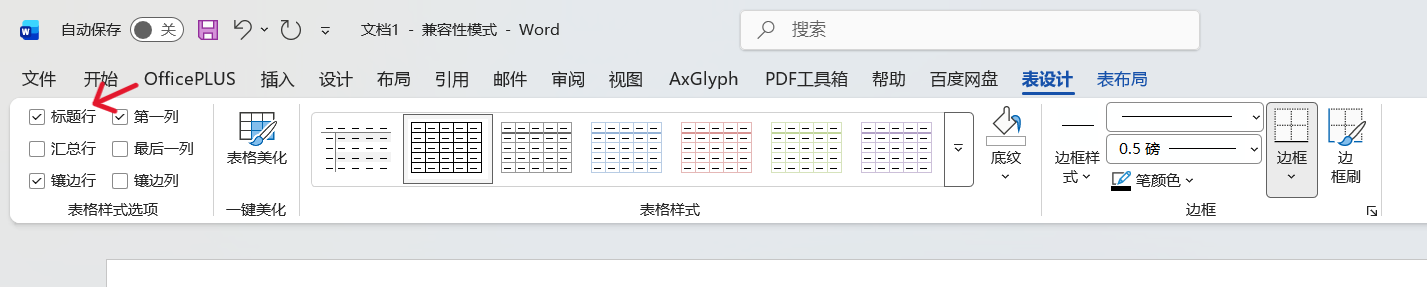 AI Visual Insight: The image shows Word’s Table Style Options panel, including toggles such as Header Row, Total Row, and Banded Rows. It demonstrates that whether a style applies to the header is not automatic; it depends on explicitly enabling “Header Row.”
A custom style should be split into global borders and header borders in two steps
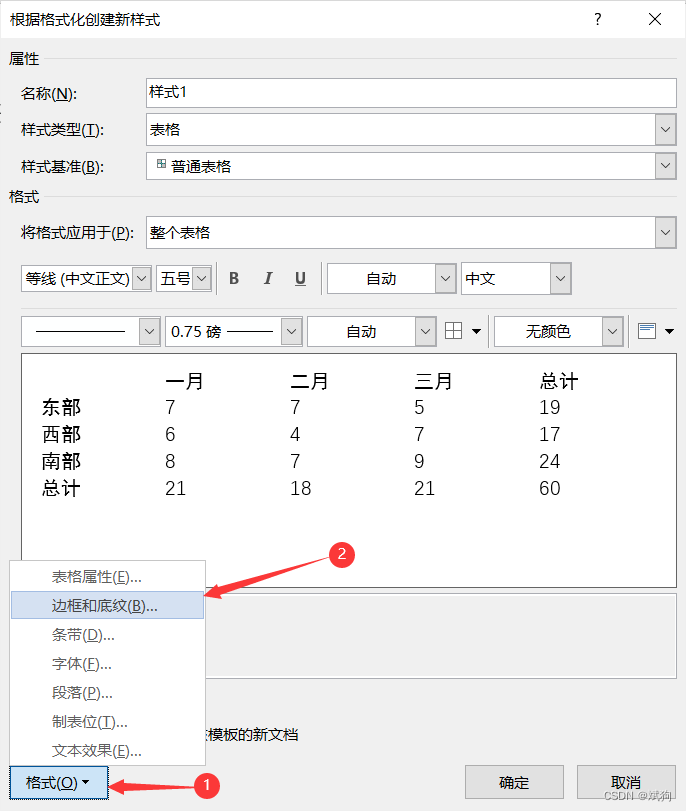
First, set the top and bottom rules for the “Whole Table.” Then switch to “Header Row” and set the header rule. This is the most stable approach. It allows batch reuse and avoids inconsistencies caused by manual line adjustments.
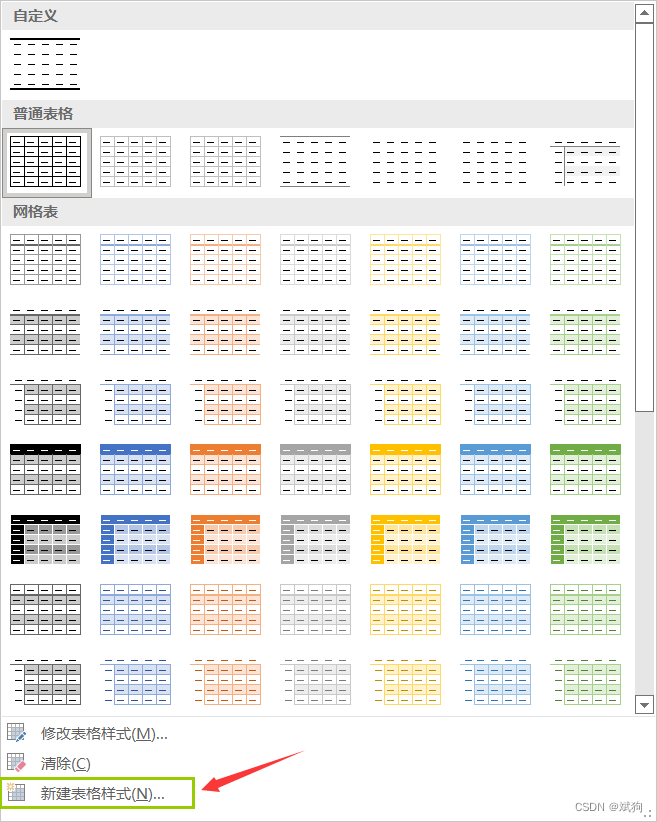
 AI Visual Insight: The image shows the formatting interface for creating a new table style in Word. The key point is setting the style scope to “Whole Table” and preserving only the thick top and bottom rules through the border panel.
 AI Visual Insight: The image shows the area for selecting border line styles and widths, illustrating that three-line table creation is essentially about precise control over border direction and point size, not simply applying a template.
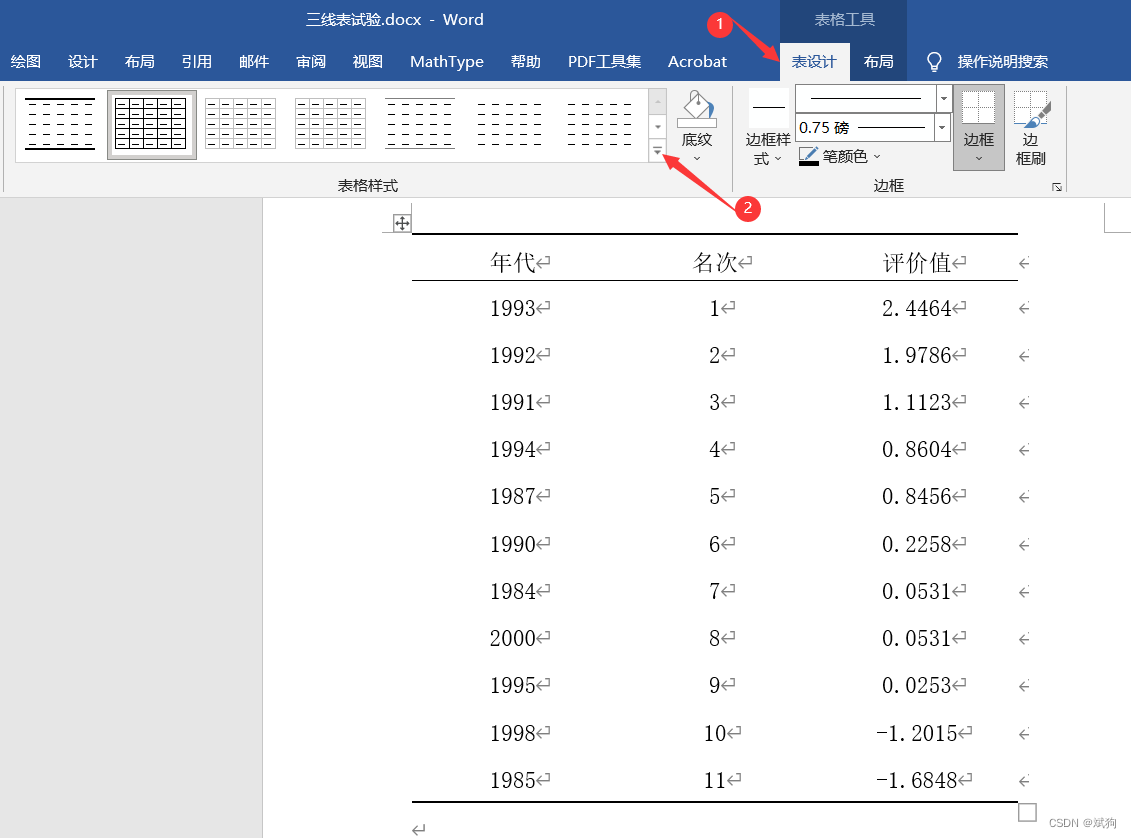
 AI Visual Insight: The image shows a preview of the table after the style has been created. The top and bottom rules clearly reinforce the table boundary, while the thin rule between the header and data area creates a more standardized and consistent layout.
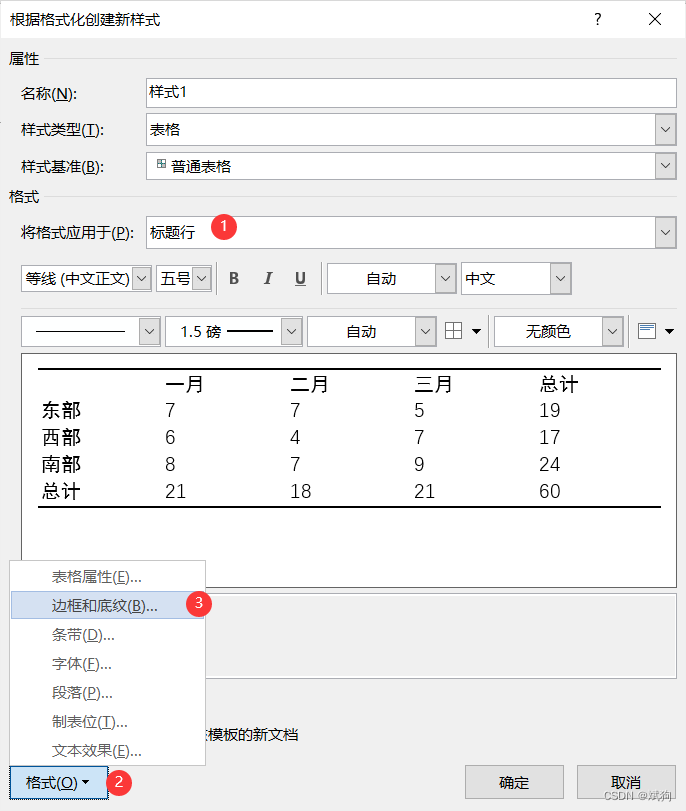 AI Visual Insight: The image focuses on the “Header Row” formatting configuration, emphasizing that the header rule must be bound to the header area rather than the entire table. Otherwise, the standard middle separator of a three-line table will not form correctly.
Style 1: Whole Table -> Top border 1.5 pt, bottom border 1.5 pt
Style 2: Header Row -> Bottom border 0.75 pt
Before applying: enable "Header Row"
This setup turns multi-table formatting from repetitive manual work into a one-time configuration that can be reused throughout the document.
The LaTeX approach provides the strongest reproducibility and consistency
LaTeX is ideal for journal submissions, template-based theses, and collaborative writing. The booktabs package provides standard commands for three-line tables and can reliably generate rule styles that align with publishing standards.
Its main advantage is not “showing off with code,” but reproducible formatting. As long as the column definitions and rules remain consistent, the table style stays uniform across devices and collaborators.
\documentclass{article}
\usepackage{ctex} % Chinese support to ensure Chinese text compiles correctly
\usepackage{booktabs} % Three-line table package that provides standard horizontal rule commands

\begin{document}

\begin{table}[htbp]
  \centering % Center the table
  \caption{Comparison of Data Across Experimental Groups}
  \begin{tabular}{lcr}
    \toprule[1.5pt] % Top rule: thick line
    表头1 & 表头2 & 表头3 \\
    \midrule[0.75pt] % Header rule: thin line
    数据1 & 数据2 & 数据3 \\
    数据4 & 数据5 & 数据6 \\
    \bottomrule[1.5pt] % Bottom rule: thick line
  \end{tabular}
\end{table}

\end{document}
This code uses booktabs to generate a standard three-line table directly and serves as a minimum viable template for LaTeX academic typesetting.
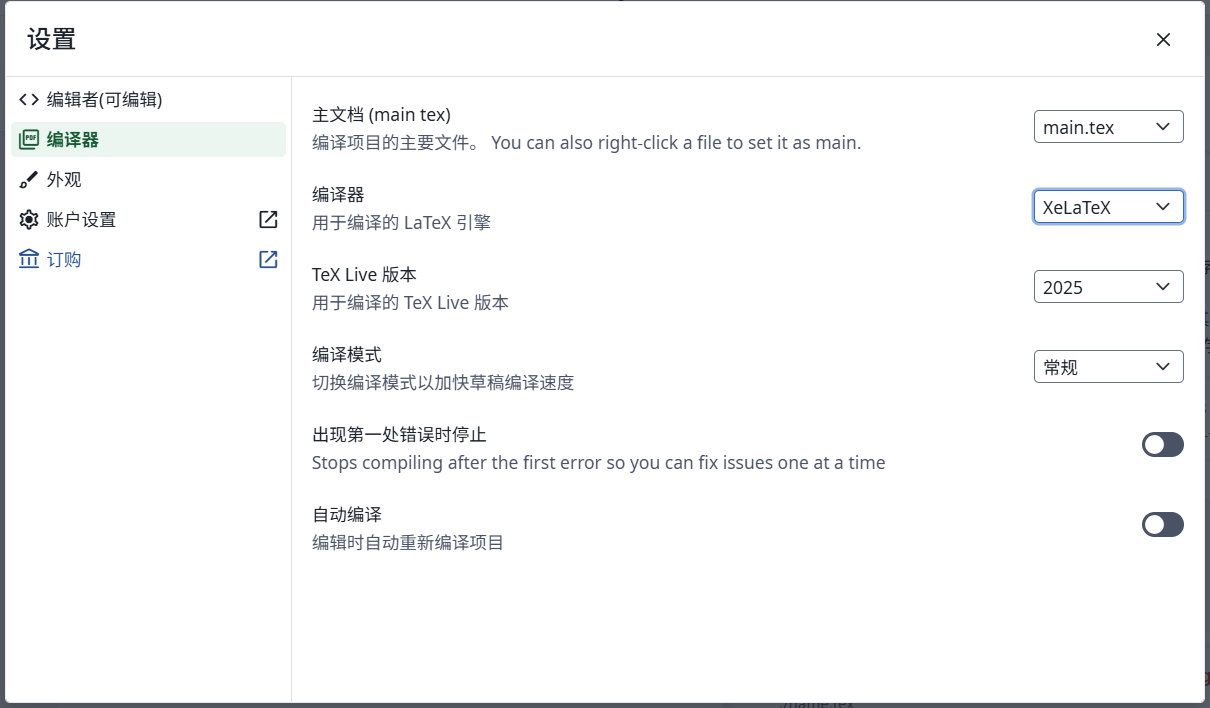 AI Visual Insight: The image shows the compiler settings interface in Overleaf. The key action is switching the compiler to XeLaTeX so that
 ctex Chinese support works correctly and prevents garbled Chinese table headers and notes.
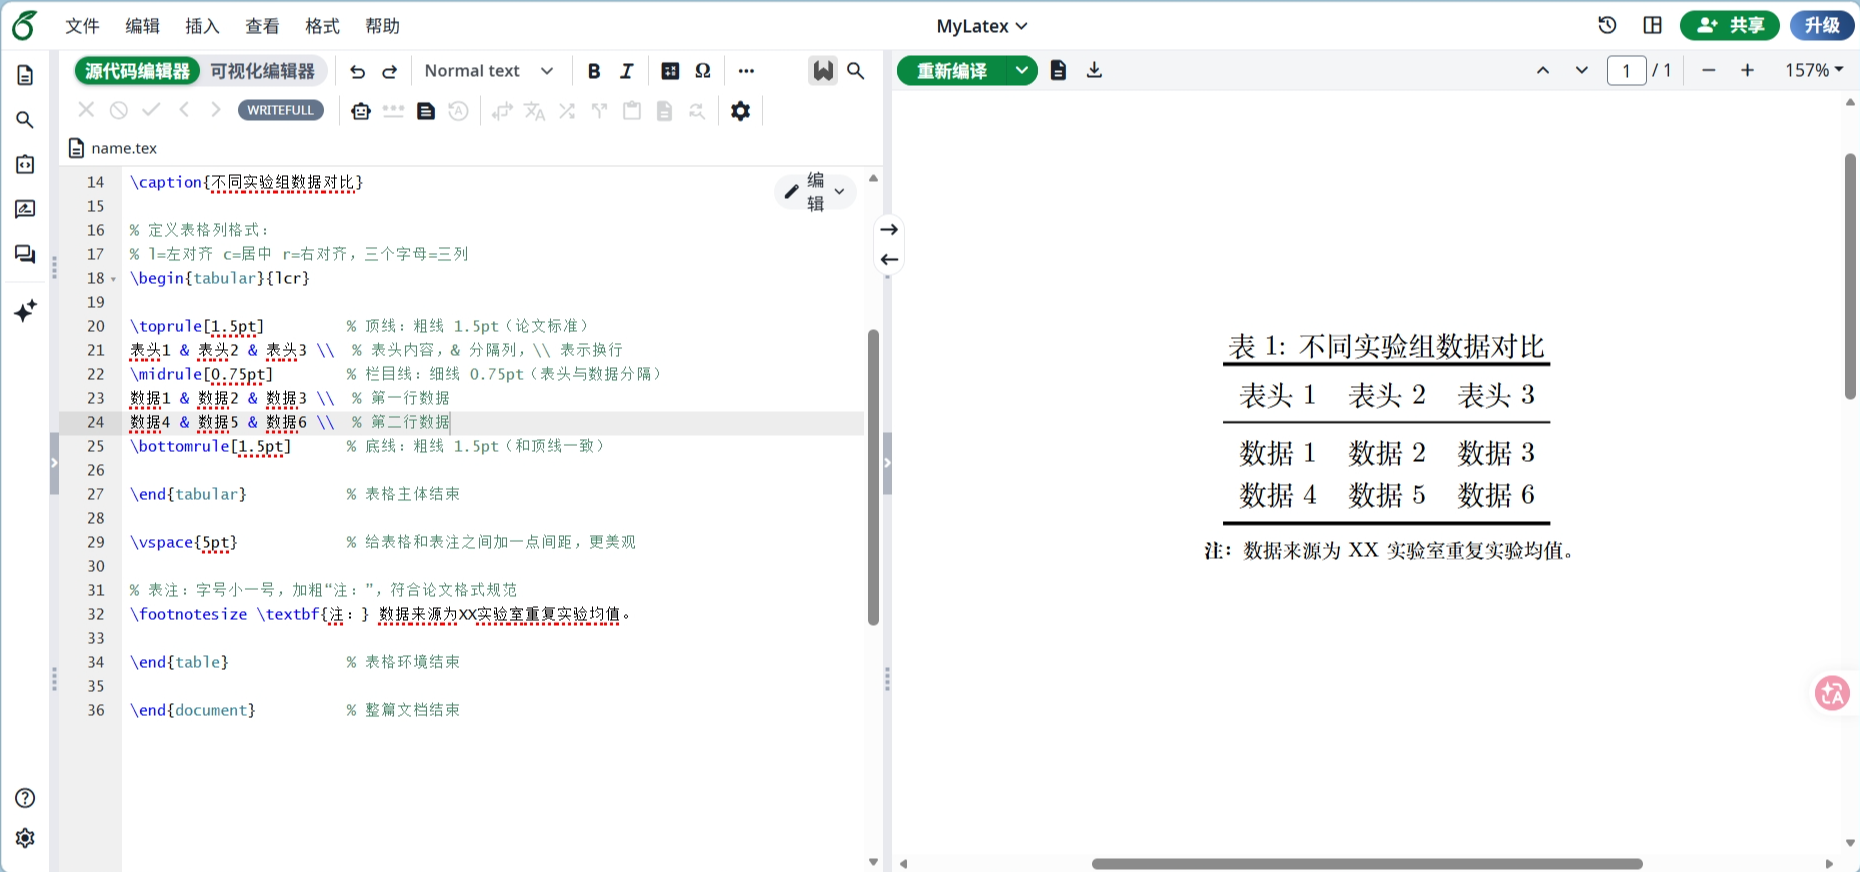 AI Visual Insight: The image shows the final rendered table in LaTeX. The rule weights are consistent and the text alignment is stable, demonstrating that
 booktabs produces clearly better output quality for academic typesetting than manual drag-and-adjust workflows.
Continued tables across pages must preserve header and rule continuity
Word and WPS offer relatively weak support for continued tables across pages, so manually splitting the table is often the practical solution. The core principle is this: if the original table has not truly ended, the bottom of the previous page should not use the final thick bottom rule; the continued table must fully repeat the header and be labeled “Table X (Continued).”
 AI Visual Insight: The image shows the entry point for splitting tables in WPS. It illustrates that continued tables across pages are not handled as automatic pagination, but through manually controlled breakpoints that preserve consistency in subsequent headers and borders.
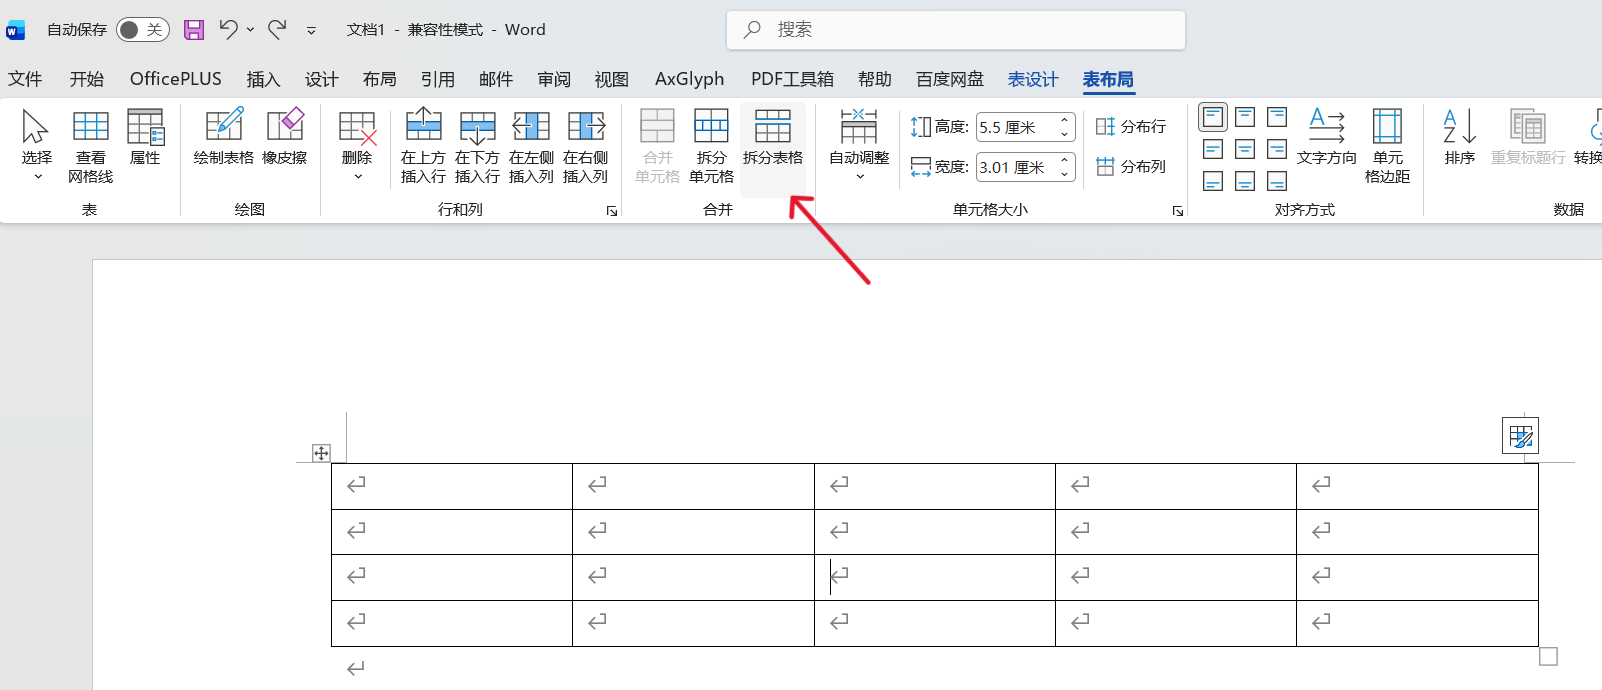 AI Visual Insight: The image shows the location of the Split Table command in Word. It reflects that cross-page layout requires proactively splitting the table object at the layout level rather than relying on default pagination.
Common mistakes usually appear in the details, not the main workflow
When the table header is too long, do not create hierarchy by adding extra horizontal lines. Likewise, do not bold table body data arbitrarily. Dashed lines in WPS are only visual editing aids and do not appear in printed or exported output. If you need to simulate a three-line table on the web, you can use 2px and 1px as approximate mappings for 1.5 pt and 0.75 pt.
 AI Visual Insight: The image shows an incorrect practice of using extra horizontal lines to separate wrapped header content. This breaks the semantic continuity of the header and can make readers misinterpret it as an additional header hierarchy.
 AI Visual Insight: The image explains that dashed table lines in WPS are editing-assist boundaries used to indicate cell layout and do not appear in the final printed or exported result.
FAQ: Structured Answers
FAQ 1: Is a three-line table absolutely forbidden from having a fourth line?
No. In scenarios such as multi-level headers, grouped statistics, or continued tables, you may add auxiliary thin rules. The key is not the number of lines, but whether the table still maintains an academic style in which the main rules stand out and auxiliary rules remain restrained.
FAQ 2: Why does a Word custom style show only the top and bottom rules?
Most likely because “Header Row” is not enabled. The header rule is usually bound to the header row style. If that toggle is off, the bottom border below the header will not render.
FAQ 3: How should I choose between Word, WPS, and LaTeX for a paper?
Choose WPS for one-off short tasks, Word custom styles for documents with many tables, and LaTeX when you need reproducible formatting, submission-grade compliance, and template-based collaboration.
Core Summary: This article systematically reconstructs both the academic standards and the practical workflows for three-line tables. It covers three implementation paths in Word, WPS, and LaTeX; explains the standard point sizes for the top rule, header rule, and bottom rule; clarifies how to handle continued tables across pages; and highlights common mistakes, helping academic writers quickly produce publication-ready tables for journals and theses.