This is a visual CSS animation editor built for frontend developers. Its core capability is to generate production-ready keyframe animation code through timeline dragging, property panel adjustments, and real-time preview, solving the inefficiency of repeatedly refreshing pages while tuning animations by hand. Keywords: CSS Animation, keyframes, timeline editor.
Technical specifications are summarized here
| Parameter | Description |
|---|---|
| Languages | CSS, TypeScript, JavaScript |
| License | Not explicitly stated in the article; the original source is marked as CC 4.0 BY-SA repost license |
| Stars | Not provided |
| Core dependencies | React event model, CSS @keyframes, animation, IntersectionObserver |
| Tool format | Online visual editor |
| Core output | Copyable CSS animation code |
This category of tools solves the feedback latency problem in animation development
CSS animation itself is not complicated. The real challenge is the high cost of parameter tuning. Developers often need to repeatedly modify @keyframes, transform, opacity, and timing functions, then refresh the page again and again to validate the result.
The value of a visual timeline editor is not that it replaces CSS. It moves the trial-and-error phase that normally happens before final code is written into a graphical workflow. That lets you lock in motion paths, timing, and keyframe distribution first, then export maintainable style code.
CSS animation behavior is determined by keyframes and playback parameters together
@keyframes defines the animation script, while animation defines how it plays. The former describes state changes from 0% to 100%, and the latter controls duration, easing curve, delay, iteration, and direction.
.element {
  animation: slideIn 0.6s ease-out forwards; /* Define the name, duration, easing, and final state */
}

@keyframes slideIn {
  from {
    transform: translateX(-100%); /* Start outside the left side of the viewport */
    opacity: 0; /* Start fully transparent */
  }
  to {
    transform: translateX(0); /* Return to the natural position */
    opacity: 1; /* Become fully visible */
  }
}
This code shows the most basic slide-in animation: keyframes define the states, and animation determines how those states are played.
The animation shorthand order must stay stable and predictable
The source material highlights a common pitfall: timing-function must appear before delay, or the shorthand property can be parsed incorrectly. Another frequent issue is ignoring fill-mode, which causes the element to snap back after the animation ends.
const buildAnimation = () => {
  let value = `${name} ${duration}s ${timingFunction}`; // Concatenate name, duration, and easing first
  if (delay > 0) value += ` ${delay}s`; // Append delay next
  value += ` ${iterationCount} ${direction}`; // Add iteration count and direction
  if (fillMode !== 'none') value += ` ${fillMode}`; // Output fill-mode only when needed
  return value;
};
This logic safely generates an animation shorthand string and prevents errors caused by an invalid property order.
The core of a timeline editor lies in its keyframe data model
A timeline is not just a UI widget. It is fundamentally a visual mapping of a keyframe array. Each point represents an offset and a set of style properties, and the editor must make those points draggable, sortable, and deduplicated.
interface KeyframeData {
  offset: number; // 0-100, the percentage position of the keyframe
  translateX: number; // X-axis translation
  translateY: number; // Y-axis translation
  scale: number; // Scale factor
  rotate: number; // Rotation angle
  opacity: number; // Opacity
  backgroundColor: string; // Background color
}
This definition shows that the editor does not manipulate raw CSS text directly. Instead, it maintains a structured animation state first and generates code afterward.
Timeline click and snapping behavior define the editing experience
The interaction priority on a timeline is precision with low friction. The original implementation uses 5% snapping, a practical tradeoff between flexibility and control that significantly reduces overly fragmented keyframe placement.
const handleTimelineClick = (e: React.MouseEvent
<HTMLDivElement>) => {
  const rect = e.currentTarget.getBoundingClientRect();
  const x = e.clientX - rect.left;
  const percent = Math.round((x / rect.width) * 20) * 5; // Snap to the nearest 5% tick
  const clamped = Math.max(0, Math.min(100, percent)); // Clamp to the 0-100 range

  if (!keyframes.some(k => k.offset === clamped)) {
    addKeyframe(clamped); // Avoid duplicate positions and add a new keyframe
  }
};
This code converts a timeline click into a percentage, snaps it to the scale, and inserts a keyframe automatically.
The CSS code generator is the editor’s most critical output capability
Whether the editor is truly useful depends on whether the exported CSS is readable, copyable, and maintainable. At a minimum, the generator must handle three things: keyframe sorting, transform composition order, and selective output of non-default properties.
const generateKeyframesCSS = (keyframes: KeyframeData[]) => {
  const sorted = [...keyframes].sort((a, b) => a.offset - b.offset); // Sort by time

  return `@keyframes myAnimation {\n${sorted.map(k => {
    const transforms: string[] = [];
    if (k.translateX !== 0 || k.translateY !== 0) {
      transforms.push(`translateX(${k.translateX}px) translateY(${k.translateY}px)`); // Apply translation first
    }
    if (k.scale !== 1) transforms.push(`scale(${k.scale})`); // Apply scaling next
    if (k.rotate !== 0) transforms.push(`rotate(${k.rotate}deg)`); // Apply rotation last

    const props: string[] = [];
    if (transforms.length) props.push(`transform: ${transforms.join(' ')};`);
    if (k.opacity !== 1) props.push(`opacity: ${k.opacity};`);
    props.push(`background-color: ${k.backgroundColor};`);

    return `${k.offset}% { ${props.join(' ')} }`;
  }).join('\n')}\n}`;
};
This generator converts structured keyframes into standard CSS and keeps the translate → scale → rotate order stable.
The image reveals the tool’s core pain point and interaction goal
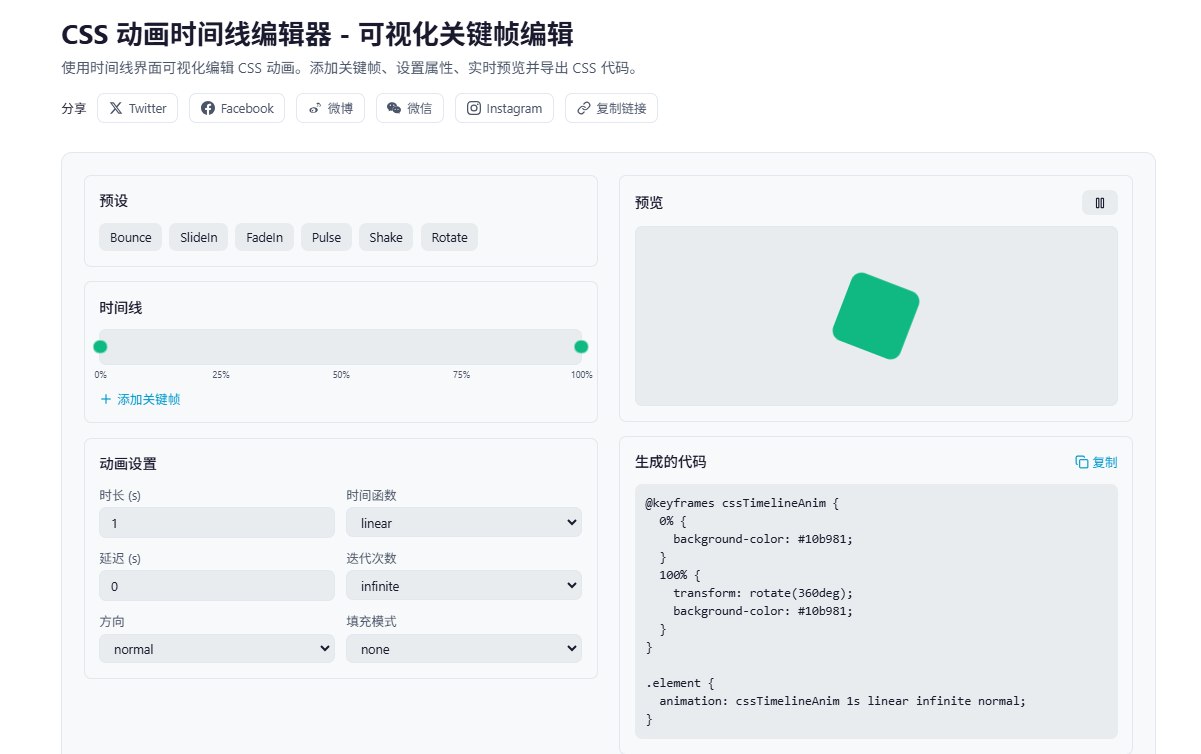 AI Visual Insight: This screenshot supports the problem context that hand-writing keyframes is difficult to validate instantly. It highlights the inefficient workflow of repeatedly modifying parameters, refreshing the page, and observing the result during animation development. The emphasis is not on branding elements, but on the need to shift from code-driven tuning to visual feedback, meaning the editor should provide a timeline, property controls, and synchronized preview at the same time.
Preset animations reduce the cost of designing from a blank state
Presets are not just a convenience feature. They are the entry point to template-driven animation production. Patterns such as bounce, pulse, shake, and fadeIn cover four common scenarios: button feedback, loading indicators, error cues, and page entrance transitions.
const presetAnimations = {
  bounce: {
    keyframes: [
      { offset: 0, translateY: 0, scale: 1 },
      { offset: 25, translateY: -40, scale: 1.1 },
      { offset: 50, translateY: 0, scale: 1 },
      { offset: 75, translateY: -20, scale: 1.05 },
      { offset: 100, translateY: 0, scale: 1 }
    ],
    duration: 1,
    timingFunction: 'ease'
  }
};
This configuration shows that a preset animation is essentially a keyframe template plus default playback parameters.
High-performance animation should prioritize compositor-friendly properties
The source repeatedly emphasizes a key performance principle: animate transform and opacity whenever possible. These properties usually avoid layout reflow, making them easier for the browser to hand off to GPU compositing.
.card {
  will-change: transform, opacity; /* Hint to the browser to optimize the rendering path in advance */
}

.card--enter {
  transform: translateY(12px); /* Use transform instead of top/left */
  opacity: 0; /* Use opacity to control visibility */
}
This style snippet demonstrates a performance-friendly animation property combination, but will-change should be used carefully and only on elements that actually animate.
This type of tool is best suited for fast delivery of small to medium interaction effects
For landing pages, button feedback, card entrances, tooltip bubbles, and loading animations, a visual editor like this can significantly shorten the path from idea to code. It is especially effective in project stages where the animation is not very complex, but parameter tuning is tedious.
The tool is available at: https://jsokit.com/tools/css-animation-timeline. If a team wants to reduce the communication overhead of motion design between designers and frontend engineers, this type of tool can also serve as a prototype layer in the middle.
FAQ
1. When should you use CSS Animation instead of Transition?
Use animation when you need multiple keyframes, looping playback, complex timing control, or preset animation templates. If you only need a two-state interaction such as hover, expand, or collapse, transition is lighter and simpler.
2. Can the CSS code generated by a visual editor be used directly in production?
Yes, but you should still run two checks: first, confirm that the transform order matches your expectation; second, remove unnecessary default property output. That reduces redundancy and improves maintainability.
3. Why do performance investigations usually start with transform and opacity?
Because these two properties are more likely to stay on the compositor layer and avoid frequent layout and repaint work. If many animations involve left, width, box-shadow, or filter, the likelihood of performance jank rises significantly.
[AI Readability Summary]
This article reconstructs and explains the core design of the CSS Animation Timeline tool: timeline editing, keyframe modeling, CSS code generation, preset animations, and performance optimization. It helps frontend developers produce visual animation workflows and production-ready CSS more efficiently.