RabbitMQ delayed queues are commonly used for order timeout cancellation, payment result compensation, and scheduled reminders. This article compares two implementation patterns—DLX+TTL and the
delayed-messageplugin—and explains dead-letter triggering, Spring Boot configuration, and the decision boundaries for each approach. Keywords: RabbitMQ, delayed queue, dead-letter exchange.
Technical specification snapshot
| Parameter | Description |
|---|---|
| Core languages | Java, Bash |
| Messaging protocol | AMQP |
| RabbitMQ version | 3.8.x |
| Deployment environment | Linux / CentOS / Rocky / Docker |
| Spring-side dependencies | Spring AMQP, RabbitTemplate |
| Delay implementation 1 | DLX + TTL |
| Delay implementation 2 | rabbitmq_delayed_message_exchange plugin |
| Repository popularity | Star count not provided in the source |
The core goal of RabbitMQ delayed queues is to process future tasks asynchronously
A delayed queue is not about immediate consumption. It is about delivery at a later time. It fits scenarios such as automatically closing unpaid orders, polling payment status, expiring coupons, and sending scheduled notifications.
Compared with database polling or scheduled scans at the application layer, message queues offer better decoupling, traffic smoothing, and lower invalid query cost. In distributed systems especially, delayed messages turn future execution into an event-driven workflow.
Dead letters are the foundational concept behind RabbitMQ delay handling
A dead-letter message is a message that can no longer be consumed normally or remain in its original queue. RabbitMQ does not discard it directly. Instead, it republishes the message to a predefined dead-letter exchange, which then routes it to a dead-letter queue.
There are four common dead-letter triggers: the consumer rejects or nacks a message without requeueing it, the message TTL expires, the queue length exceeds its limit, or the queue byte size exceeds its limit. Among them, TTL expiration is the most common entry point for implementing delayed queues.
@RabbitListener(bindings = @QueueBinding(
    value = @Queue(name = "dlx.queue", durable = "true"),
    exchange = @Exchange(name = "dlx.direct"),
    key = {"hi"}
))
public void listenDlxQueue(String message) {
    // Listen for expired messages routed to the dead-letter queue
    log.info("消费者收到死信消息: {}", message);
}
This code declares the dead-letter queue and its binding, then consumes messages that enter the DLX path after expiration.
DLX and RepublishMessageRecoverer solve different problems at different layers
DLX is a broker-native capability. Once a message becomes a dead letter, RabbitMQ automatically reroutes it on the server side. It belongs to the infrastructure layer and works well for generic scenarios such as TTL-based delay and queue limit overflow.
RepublishMessageRecoverer belongs to the Spring AMQP application-layer recovery mechanism and usually runs after local retries are exhausted. It first ACKs the original message, then republishes a new message to a target exchange. Because of that, it is not part of the DLX path.
A dead-letter queue plus TTL can implement fixed delays natively
This pattern usually includes a normal queue, a dead-letter exchange, and a dead-letter queue. The producer sends the message to the normal queue and sets a TTL on the message. After the message expires, it becomes a dead letter and then enters the target consumer queue.
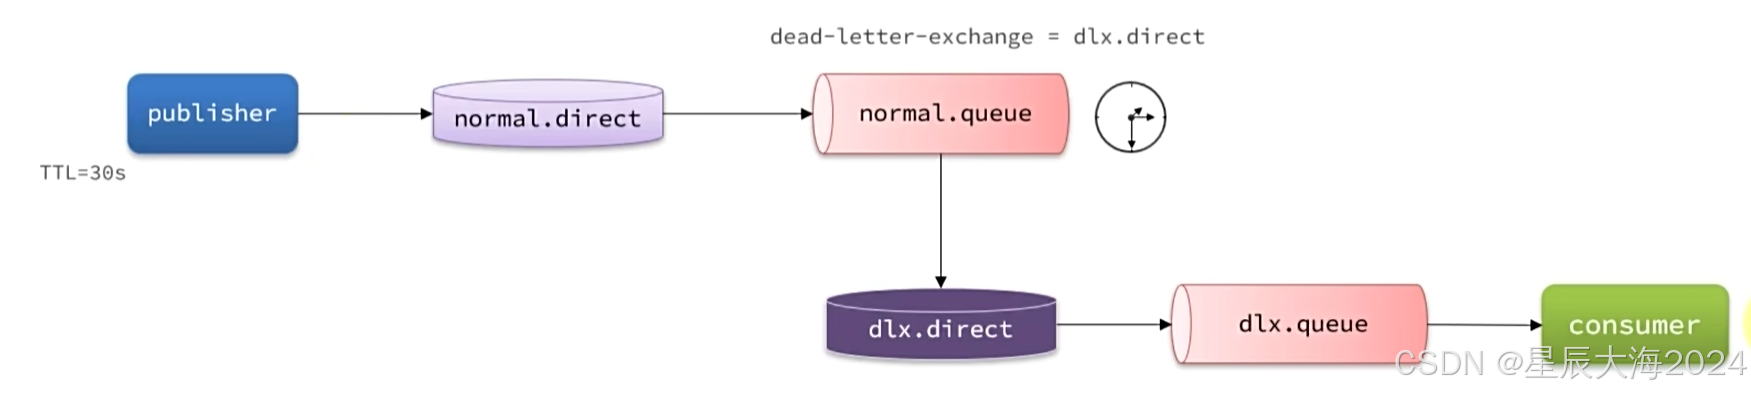 AI Visual Insight: The diagram shows a delay pipeline built from a normal queue, a dead-letter exchange, and a dead-letter queue. The message first enters the normal queue, waits for the TTL to expire, and is then republished by the broker to the DLX before being routed to the final consumer queue. This structure highlights a two-stage design: the delay happens in the original queue, while consumption happens in the dead-letter queue.
@Configuration
public class NormalConfiguration {

    @Bean
    public DirectExchange normalExchange() {
        return new DirectExchange("normal.direct");
    }

    @Bean
    public Queue normalQueue() {
        return QueueBuilder
                .durable("normal.queue")
                .deadLetterExchange("dlx.direct") // Specify the dead-letter exchange
                .build();
    }

    @Bean
    public Binding normalExchangeBinding(Queue normalQueue, DirectExchange normalExchange) {
        return BindingBuilder
                .bind(normalQueue)
                .to(normalExchange)
                .with("hi"); // Bind the routing key
    }
}
This configuration declares the normal exchange, the normal queue, and the dead-letter forwarding relationship.
When sending a message, you do not need a special exchange. You only need to attach an expiration time to the message.
@Test
public void testSendDelayMessage() {
    rabbitTemplate.convertAndSend("normal.direct", "hi", "hello everyone", message -> {
        message.getMessageProperties().setExpiration("10000"); // Set a TTL of 10 seconds
        return message;
    });
}
This code implements a 10-second delay through message-level TTL. After expiration, the message enters the dead-letter path.
The delayed-message plugin is a better fit for dynamic delays and precise delivery
The main issue with DLX+TTL is that the configuration is relatively verbose, and the model is better suited to fixed-delay patterns. RabbitMQ’s official delayed-message plugin supports delayed delivery directly through a special exchange, which can simplify the model significantly.
The mechanism is straightforward: the message first enters the delayed exchange, where the plugin stores it temporarily. Once the configured time arrives, the exchange routes it to the target queue. Compared with the dead-letter approach, the delay logic is more centralized and the message model is easier to understand.
In Docker, plugin installation starts with verifying the plugin volume path
If RabbitMQ runs in Docker, a common approach is to inspect the data volume mapped to the plugin directory first, copy the .ez plugin file into that path, and then run the enable command.
docker volume inspect mq-plugins
cd /var/lib/docker/volumes/mq-plugins/_data
docker exec -it mq rabbitmq-plugins enable rabbitmq_delayed_message_exchange
These commands verify the plugin volume, place the plugin file in the correct location, and enable delayed-message support.
Annotations let you declare a delayed exchange and target queue quickly
Spring AMQP supports setting delayed = "true" directly in @Exchange. This means the exchange will be declared as a special exchange that supports delayed delivery.
@RabbitListener(bindings = @QueueBinding(
    value = @Queue(value = "delay.queue", durable = "true"),
    exchange = @Exchange(value = "delay.direct", delayed = "true"),
    key = "hidelay"
))
public void listenDelayQueue(String msg) {
    // Listen for messages delivered after the plugin delay
    log.info("delay.queue: {}", msg);
}
This code uses annotations to declare the delayed exchange, queue, and binding in one place.
Bean-based configuration is better for consistency and large-scale engineering
When a project needs standardized management of exchanges, queues, and routing keys, the @Bean approach is easier to read and simpler to test and reuse.
@Configuration
public class DirectConfiguration {

    @Bean
    public DirectExchange delayExchange() {
        return ExchangeBuilder
                .directExchange("delay.direct")
                .delayed() // Declare a delayed exchange
                .durable(true)
                .build();
    }

    @Bean
    public Queue delayedQueue() {
        return new Queue("delay.queue");
    }

    @Bean
    public Binding delayQueueBinding() {
        return BindingBuilder.bind(delayedQueue()).to(delayExchange()).with("hidelay");
    }
}
This code shows the standard bean-based declaration pattern for a delayed exchange, which works well for medium and large service architectures.
When sending a message, use setDelay to specify the delay in milliseconds instead of using TTL.
@Test
public void testSendDelayMessageByPlugin() {
    rabbitTemplate.convertAndSend("delay.direct", "hidelay", "hello", message -> {
        message.getMessageProperties().setDelay(10000); // Set a 10-second delay
        return message;
    });
    log.info("消息发送成功");
}
This code uses the plugin-provided delay header to deliver delayed messages more directly.
Your architecture choice should depend on throughput, precision, and platform constraints
The advantages of DLX+TTL are that it is native, stable, and plugin-free. In most cases, it is a better fit for ultra-high concurrency, fixed delays, and cloud-managed environments. Its drawbacks are configuration complexity and the fact that different delay granularities often require modeling with multiple queues.
The plugin approach supports arbitrary dynamic delays, offers more precise delivery, and keeps the message model simpler. Its drawbacks are dependency on the plugin ecosystem, lack of support in some cloud services, and possible limits imposed by the plugin’s internal storage behavior when large volumes of delayed messages accumulate.
Recommended engineering criteria for choosing between the two
If your workload looks like “automatically cancel an unpaid order after 30 minutes,” prefer DLX+TTL first. If your workload needs dynamic delays such as “7 seconds,” “13 minutes,” or “3 hours and 15 minutes,” the plugin is a better fit.
If your system runs on a self-managed RabbitMQ cluster, evaluate the plugin option early. If it runs on a restricted cloud platform, verify whether rabbitmq_delayed_message_exchange is supported first. Otherwise, default to DLX+TTL.
FAQ
1. Why does RabbitMQ not provide a standalone native delayed queue?
RabbitMQ natively provides TTL, dead-lettering, and routing mechanisms. Delay handling is typically built by combining these foundational features. The official plugin adds a more direct delayed-delivery capability at the exchange layer.
2. Which is better for production: DLX+TTL or the delayed-message plugin?
Both can be used in production. Prefer DLX+TTL for fixed delays, high throughput, and cloud compatibility. Prefer the plugin approach for dynamic delays, simpler configuration, and better delivery precision.
3. What is the easiest issue to overlook when using delayed queues?
The easiest issues to overlook are idempotency and message backlog. Delay handling only solves when to deliver a message. It does not solve duplicate consumption, retry failure, or eventual consistency. Your business logic still needs to handle those concerns.
[AI Readability Summary] This article systematically explains the two mainstream ways to implement RabbitMQ delayed queues: dead-letter queues with TTL and the delayed-message plugin. It covers dead-letter mechanics, Spring AMQP configuration, Docker plugin installation, delayed message publishing examples, and practical guidance for choosing between the two approaches based on precision, throughput, complexity, and cloud compatibility.